Archived entries: Tutorials&Presets

Good news, everyone!

I have been using Dreamhost for many years now and could not be happier with the quality of service they provide. I have used many hosts in the past (doesn’t it sound like a creepy sci-fi quote?) and always suffered from messed up controls, poor plans, incompetent support – all that until I switched to Dreamhost. No matter how hard I mess up, what files I accidentally delete and whichever databases I corrupt – they always manage to get my sites back up and running quickly and professionally.

I do however realize that media streaming from QubaHQ can be a bit slow at times. Apparently it varies from day to day and from user to user, but I have received enough complaints to actually take action and do something about it.

It is my pleasure to announce that from now on all the new tutorial content from QubaHQ will be hosted in at Vimeo. All the future tutorials will be published in HD (720p at 30fps) resulting in both much better viewing experience and increased file sizes. Vimeo seems like the best match to host such content. Additionally, the videos will now be viewable both on computers and on all the major mobile platforms, including iPhone and iPad. You will also be able to download and save the entire tutorials both from Vimeo and from QubaHQ.

While I want you to keep coming back to the site, you may now also subscribe to the new Vimeo channel with my tutorials at: http://vimeo.com/channels/qubahq

I need a hand with the next tutorial…

Quite literally, I need a hand with the next tutorial for QubaHQ. To be precise, I am looking for a CG artist who could provide me with either a render, realistic illustration or a 3D model of a human hand in two forms: normal and skeleton only.

Why? Quite simply, because I am bored of using text layers for every effect in the tutorials, and would like to do something special for you guys this time.

If you are willing and able, simply reply to this post – if you are a registered user of this site, I will look up the e-mail you registered with and contact you shortly. The images used in the next tutorial will also be distributed with the project file, so please make sure you own the rights to them and are OK with giving them away for free (no budget on this gig, except for credits).

Hope to hear from some of you soon!

Poll Results: CS3 it is (huh?)

OK, so after running the poll for around 2 weeks, the results are in. A majority of you are using After Effects CS4, with CS5 following closely in a second place. CS3 takes the third with 14% of votes. What does that mean?

It pretty much means I will continue producing the tutorials using CS3 as a base, lowest version supported.

More after the break.

Continue reading…

Poll for Y’all

With the new system up and running, I am slowly getting ready to resume producing new tutorials. On the old system I always kept a copy of After Effects CS3 installed and made all the tutorials using that version for all the folks using older versions of AE.

I have migrated my workflow to CS5 quite a while back and was wondering – which version of After Effects do you use? Is there even a need to make the files CS3-compatible anymore? Do I really have to install the old program on my computer?

The results of this poll will help me determine how to proceed. It will remain open until the end of October, so cast your vote and let others know to do the same – the larger the voting base the more accurate the information will be. Also, feel free to comment on this post if your answer cannot be summarized with a simple 1-choice selection.

Which version of After Effects do you use?

  • CS4 (47%, 138 Votes)
  • CS5 (38%, 111 Votes)
  • CS3 (14%, 40 Votes)
  • CS2 or older (1%, 3 Votes)

Total Voters: 292

Loading ... Loading ...

The poll is now closed.

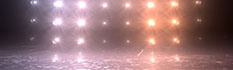
Tutorial+Preset: Light Wall

Hello everyone! Yes, it is here – a long-delayed new tutorial from the June series. It’s been around 6 weeks since the previous tutorial, but I have been incredibly busy building a new kick-ass hi-tech intro for the tutorials… No. Not really. The truth is I have been working on multiple commercial projects and could not find any time off for neither leisure nor tutorials. As for the intro – I knocked it together in a few minutes at 4:00AM last night.

This tutorial is a hybrid between the Automated Light Rig and Scrolling LED Text. We will be building an animated image map driven light array that can be used for for either cool light effects or easily controlled particle emission.

While the entire project can be completed within After Effects, I will also jump into Cinema 4D every now and then and show you a very easy way for creating quite complex light arrays and importing them back into AE.

Music used in the trailer comes from Beck’s Cellphone’s Dead from the album The Information. Music in the intro comes from… here.

Running time: 73min
Difficulty: Easy-Advanced (depending how much you want to learn :)
Required tools: After Effects
Optional software and plug-ins: Cinema 4D, Trapcode Particular, VC Optical Flares (or similar)

Continue reading…

Still Swamped

I know many of you are still waiting for me to complete the two remaining tutorials promised for June. It seems however that it is going to take a while longer. Summertime is usually a very slow commercial season with not many TVCs being produced, so I naturally assumed I will have tons of free time to work on the tuts.

Things tend to work out not according to plan, though. I am still completely swamped with the projects for various clients and new ones just keep on coming. My current estimate is that I will be able to catch a break and record the next tutorial probably within 1-2 weeks, but only time will show if that’s realistic at all.

QubaHQ tutorials are quite important to me – just so you know, I have decided that I will not play a minute of Starcraft 2 until we get the next one online. And that’s a big commitment for me :)

Header photo by Ajfraser

Tutorial+Preset: Automated Light Rig

Most of the time it is the best practice to manually control the lights in your After Effects scenes. There are situations however, when you may want to automate the dynamic changes in light color and intensity while maintaining high level of control over the look of your composition. That’s what the Automated Light Rig is all about.

In this tutorial I will show you how to link your lights with automated samplers on an image map, creating an ever-changing, yet unified, light rig. While the tutorial explains the expressions in depth, I am also providing you with presets simplifying the entire process into just few clicks.

As a little extra, I will also show you how to create a 3D light-aware smoke using Trapcode Particular (my method is a bit more involved than the standard Particular setup, but produces results that are much more true to life).

Music used in the trailer comes from Mr. Oizo’s Fiat 55 from the album Analog Worms Attack.

Running time: 45min
Difficulty: Easy-Medium
Required tools: After Effects
Optional plug-ins: Trapcode Particular

Continue reading…

Tutorial: 100% Accurate Reflections

In this After Effects tutorial I will demonstrate to you how to build a two-camera rig in order to create perfect 3D reflections. Using this technique, you will be able to reflect not only 3D layers, but also lights, particles, as well as any plug-in that obeys the movement of AE’s 3D camera.

The setup is trivially easy when using hand-animated cameras, but in the second half of the video I also show you how to create a more complex rig for use with Video Copilot’s Sure Target 2 camera controls.

The music used in the preview is a fragment of an Instrumental Mix of Perfect Exceeder by MASON vs Princess Superstar.

Running time: 51 min
Difficulty: Easy (you will be surprised how easy)
Required tools: After Effects (CS3 and above)
Optional plug-ins: VC Optical Flares, Knoll Light Factory, Trapcode Lux, Trapcode 3D Stroke, Trapcode Particular

Continue reading…

QubaHQ Tutorials: June Trailer

I have big plans for QubaHQ Tutorials in June. Over the course of the last few days I thought up and implemented four new techniques that I will share with you over the course of the coming month. Well, at least I hope to be able to push all the content out in a span of 30 days.

Check the rest of this post for the teaser trailer, as well as a short explanation of things to come.

Continue reading…

Tutorial: Scrolling LED Text

In this After Effects tutorial I will show you how to create your own highly customizable LED screen effect, ready to convert any text or image into pixelated goodness. The video covers the setup, expressions and usage of this versatile preset.

The preview video below shows but one possible way of using the Scrolling LED Text and the tutorial concentrates on the effect itself, rather than the setup of this particular scene.

Preview video uses a photograph by LonelyBob licensed under Creative Commons. It also features 5 notes from the Solitary Wasteland track on the Flower Soundtrack by Vincent Diamante and a sample from Pac-Man by Namco. This tutorial was made possible by the espresso coffee maker gifted to me as a wedding present.

Running time: 47min
Difficulty: Medium (quite a few expressions)
Required tools: After Effects (CS3 and above)

Continue reading…


Copyright © 2004–2013. All rights reserved.

RSS Feed. This blog is proudly powered by Wordpress and uses a modified version of Modern Clix, a theme by Rodrigo Galindez.